Create your first agent
Step-by-step tutorial to build your first agent in Cotera.
What You'll Learn
In this tutorial, you'll learn how to create an agent that can search the web and return structured information. You'll understand how to write agent instructions, connect tools, test functionality, and deploy your agent for use.
Prerequisites
Before starting, make sure you have:
- A Cotera account with access to agents
- Basic familiarity with what agents are (see Agents core concept)
Step 1: Open the Agent Editor
Navigate to your Cotera home page and click the New Agent button.
The agent editor opens with two main areas:
- Left side: Where you'll write your agent's instructions
- Right side: A chat window for testing
If you want to start with a working example, Cotera provides templates you can customize. For this tutorial, we'll walk through building an agent step by step to understand each component.
Step 2: Name Your Agent
Give your agent a clear, descriptive name that indicates what it does.
Click in the name field and enter something like "Google Search Agent" or whatever fits your use case.
Good agent names are specific and actionable - they should tell you at a glance what the agent's purpose is.
Step 3: Write the Agent Instructions
The agent instructions tell your agent what its job is and how to do it. Clear instructions lead to better, more consistent results.
Define the Task
Start by explaining what you want the agent to do:
You are an agent that identifies national day observances for any given date.
This gives the agent a clear sense of purpose.
Specify the Input
Tell the agent what information it will receive:
The user will provide a date.
Being explicit about input format helps the agent understand what to expect.
Explain the Approach
Describe how the agent should accomplish its task:
Use the Google Search tool to search for national days for the given day and month.
This guides the agent's decision-making process.
Define Good Results
Help the agent understand what counts as relevant information:
Look for official observances, widely recognized celebrations, and established national days. Ignore unofficial or obscure mentions.
This filtering guidance improves result quality.
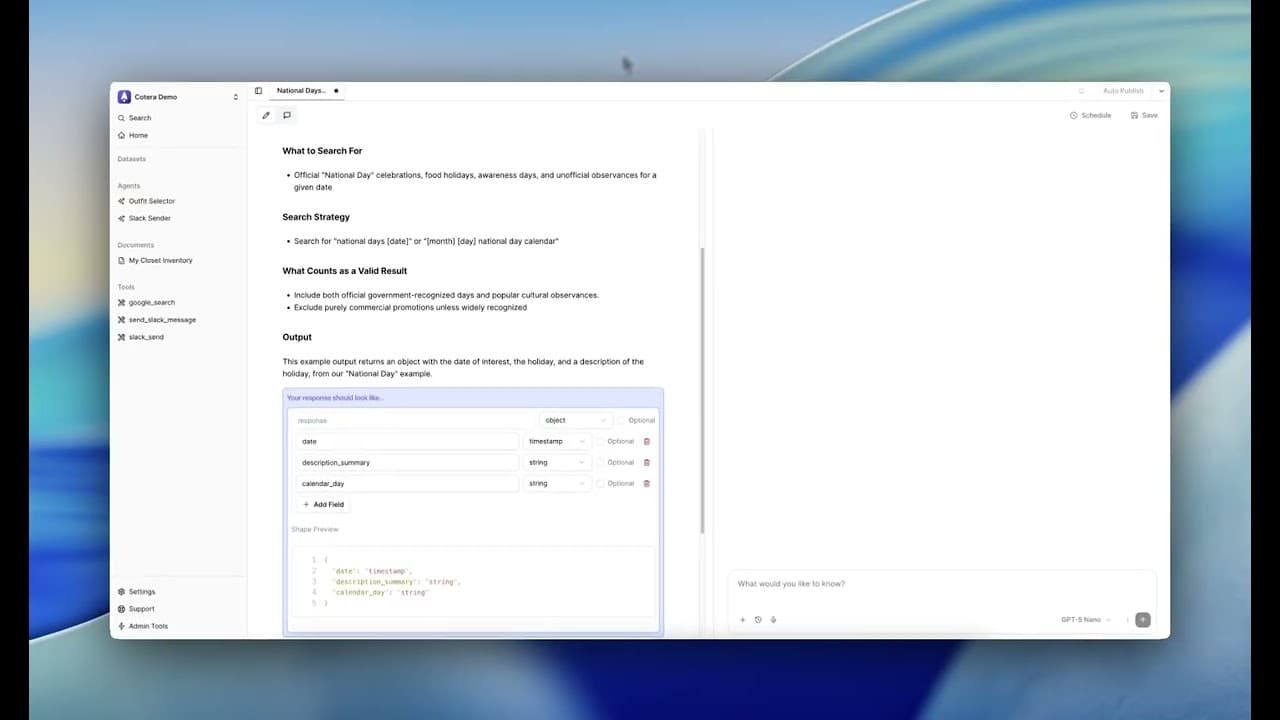
Structure the Output
Specify exactly how you want information returned:
For example:
Return your findings as a JSON object with:
- date: timestamp of the date
- calendar_day: string with the holiday name
- description_summary: string describing the observance
Structured output makes agent responses consistent and usable in automated workflows.
Step 4: Save Your Agent
Before testing, save your work:
- Click Save in the upper right corner
- Confirm your agent name if prompted
The agent now appears in your Agents list in the left sidebar. Saving is required before the chat interface and tool connections will work.
Step 6: Test Your Agent
Testing helps you verify the agent works as expected before putting it into production use.
Send a Test Query
In the chat window, type a query that matches what you told the agent to expect:
November 3rd, 2025
Click send.
Observe the Response
Watch what happens:
- The agent interprets your input
- It decides to use the Google Search tool
- The tool executes and returns results
- The agent processes those results
- It formats the output according to your specifications
You can expand the tool execution details to see the exact search query used and the raw results returned.
Evaluate the Results
Check whether:
- The agent understood your input correctly
- It used the tool appropriately
- The search was relevant to your query
- The output format matches what you specified
- The information is accurate and useful
Iterate if Needed
If something isn't right, refine your instructions and test again. Common adjustments:
- Make the task description more specific
- Add examples of good vs. bad results
- Clarify the output format
- Adjust the search strategy
Step 7: Use Your Agent
Once testing confirms your agent works well, you can deploy it.
Chat-Based Use
The simplest way to use your agent is through the chat interface:
- Open your agent from the sidebar
- Type your query
- Get immediate results
This is ideal for ad-hoc requests and exploration.
Scheduled Automation
For regular, automated use:
- Click the Schedule button
- Set your desired frequency
- Configure any parameters
The agent will run automatically and gather information on your schedule.
What's Next?
You now understand the core process of building agents in Cotera: define the purpose, write clear instructions, connect tools, test thoroughly, and deploy. These fundamentals apply whether you're building simple information-gathering agents or complex automated workflows.